For those who care about the nitty-gritty about how the combat system works, this article is for you.
Table of Contents
Initiative is a based on a simple roll of whatever is configured as the initiative stat (Alertness by default, which represents situational awareness). Most successes goes first. Ties are broken by a random die roll.
You can get 3 extra initiative dice by spending luck. You also get 3 dice for subdue, suppress or distract actions. Since their main effects expire at the end of the turn, this initiative bonus helps them to be effective.
Attacks are fundamentally an opposed roll of the attacker’s skill (based on their weapon) against the defender’s skill (based on THEIR weapon/vehicle - see defense for details).
The number of net successes on the attack roll influences the effectiveness of the attack, from hit location to damage.
If the attacker gets zero or fewer net successes, they miss. In other words - ties go to the defender.
Aiming givs a +3 bonus to attack the next turn. Spending more than one turn aiming does not increase the modifier, and the modifier is lost if you switch targets.
Suppression is resolved by making an attack roll as normal, with a defense of a Composure Roll instead of the normal defense skill. If the attack “hits”, no damage is done but a penalty is applied.
The penalty applies a number of stress points equal to 2 plus the difference between the attacker and defender’s roll results.
For example: Bruno fires his pistol to suppress Tom. Bruno rolls a 3 Hits and Tom rolls 1, giving a difference of 2. This inflicts 4 stress points on Tom.
A fully automatic or explosive weapon can suppress up to 3 targets in a single turn. Each target requires a separate attack and defense roll.
Suppression penalties apply to attacks only.
The distract action can switch an attacker’s action to ‘pass’, effectively causing them to lose a turn. This is resolved by making an attack roll against the defender’s Composure. If the attack “hits”, no damage is done but the target can take no other action for the rest of the turn.
A subdue attempt is resolved by making an attack roll as normal. If the attack “hits”, the target is subdued. No damage is done.
The attacker cannot take any other action (other than “free” actions) while subduing another character; if he does, the other character automatically escapes. An escape is resolved with the same roll again. If the defender wins, they escape and may take a normal action next turn.
Rally requires no special roll, but immediately allows the rallied character to make another Knockout Roll. If the Knockout Roll succeeds, the character is no longer knocked out.
The healer makes a first aid ability roll. If successful, it reduces wound modifiers for the target’s worst injury (the same as if a wound had been healed). It also allows a knocked out character to immediately make another Knockout Roll. If the Knockout Roll succeeds, the character is no longer knocked out.
Full-auto (8-round burst) or burst fire (3-round burst) is resolved just like a regular attack, but with a separate attack and defense roll per bullet. All bullets after the first one receive a negative modifier based on the recoil statistic of the weapon multiplied by the number of bullets so far (excluding the first).
Example: Bob is firing full-auto at a single target. His weapon has a recoil modifier of 1. He makes 8 attack rolls total, the first with a -0 modifier, the second with -1, the third with -2, etc. Defense rolls, damage, armor, etc. must be determined separately for each of the bullets.
Full-auto fire can be directed at up to 3 targets in a single turn.
| Number of Targets | Bullets Per Target |
|---|---|
| 1 | 8 |
| 2 | 3 |
| 3 | 1 |
Third edition has done away with the different target ranges for explosive attacks. Instead you can target up to three people with the explosive. There is a separate attack and defense roll for each target.
In addition to the regular attack, explosive weapons with shrapnel have a chance of doing 0-5 shrapnel wounds to each target in the blast.
The defense skill used against an attack is determined by the following chart:
| Defender in vehicle | Use vehicle pilot’s piloting skill |
| Defender and attacker both have melee weapons | Use the skill for the defender’s weapon. |
| Otherwise (including ranged/explosions) | Use the “defense” skill for the defender’s combatant type. |
For example: Erson is fighting Britt. Erson has a sword (skill: Blades) and Britt has a staff (skill: Staves). Erson uses the Blades skill for attack, but Britt uses her Staves skill for defense. When it’s Britt’s turn, she attacks with Staves and Erson defens with Blades.
Another example: This time Gray is attacking Britt. He has a rifle and she has her staff. Even though Britt has a melee weapon, she doesn’t get to use it against a firearm. She defends with the base defense skill (typically Reflexes). He also uses the base defense skill when she attacks him back.
The default “Defense” skill is Reflexes by default–an attribute rather than an actual skill. This is because there really isn’t a skill to dodging bullets or shrapnel. By using an attribute, the number of dice is lower and the Reflexes roll is mostly just a randomizer.
Note: No matter which passenger in a vehicle is targeted, the defense roll is always based on the pilot’s piloting skill.
Stances are a quick way to give attack and defense modifiers based on common situations. For example, the “Evasive” stance reflects someone who’s putting their all into dodging and weaving. This makes it much harder to hit, while also making it much harder for them to attack. Games can configure their own stances, but the built-in ones are:
| Stance | Attack Mod | Defense Mod |
|---|---|---|
| Aggressive | 2 | -2 |
| Reckless | 4 | -4 |
| Normal (default) | 0 | 0 |
| Defensive | -2 | 2 |
| Evasive | -4 | 4 |
In addition, there are two special stances:
Stress accumulates in combat as your character is attacked, making you less effective. Each stress point causes a -1 to your attack rolls.
Every attack - even if it does no damage - inflicts 1 stress point, up to a maximum of 5. The suppress attack inflicts more stress than normal - see that attack description for details.
You automatically recover 1 stress point every turn. You can recover additional stress by making a successful Composure roll - 1 extra point per success.
Some characters may wear body armor to protect them from damage. Most armor will only protect certain body parts, so the first step is using the hit location to determine whether the armor even comes into play. Some areas are protected better than others, so hit location determines the armor’s protection value.
Some weapons get through armor better than others, too. This is represented by the weapon’s penetration value. Net successes on the attack roll can help the attacker find a weak spot in the armor, boosting the weapon’s penetration value.
Armor is determined as follows:
roll = 1d8 + attacker net successes + weapon penetration - armor protection
Look up the roll value on the following table to determine the result:
| Roll | Result |
|---|---|
| 8+ | Attack found a spot not covered by armor; armor has no effect. |
| 6-7 | Attack found a weak spot. Armor reduces damage lethality by 1-24. |
| 4-5 | Armor slows some. Armor reduces damage lethality by 25-49. |
| 2-3 | Armor slows considerably. Armor reduces damage lethality by 50-99. |
| <1 | Armor stops the attack completely; no damage is done. |
The table below shows some suggested protection and penetration based on the modern world. Note that if the protection/penetration values are more than 5 apart, they’re severely mismatched. A light cannon (Pen 10) will cut like butter through kevlar armor (Protect 5), while a rifle (pen 6) has no chance against an APC (Protect 12). Kevlar and small arms are evenly matched (5-6 vs. 7-8) so the armor has a good chance of at least slowing the bullet down or even stopping it completely.
| Weapon / Armor | Penetration / Protection Value |
|---|---|
| Interior wall (drywall / plaster) | 3 |
| Knife | 4 |
| Solid wood furniture | 5 |
| Anti-Personnel Shrapnel | 5 |
| Light body armor (undershirt vest) | 5-6 |
| Light small arms (pistols, SMGs) | 5 |
| Military body armor (kevlar vest) | 7-8 |
| Medium small arms (rifles) | 6 |
| Car door | 4 |
| Brick wall | 7 |
| Light Truck | 7 |
| Fighter Jet | 7 |
| Heavy small arms (12.5mm/.50cal) | 8 |
| Light cannon (20mm) | 10 |
| Cargo aircraft / Bomber | 10 |
| Anti-Aircraft Missile | 12 |
| Armored Personnel Carrier (APC) | 12 |
| Medium cannon (40mm) | 17 |
| Tank | 22 |
| Tank cannon | 23 |
| Anti-Tank Missile | 25 |
If a target is in cover, the attack has a chance of being stopped by cover instead of hitting the target.
| Attack Roll | Chance of Hitting Cover |
|---|---|
| Crushing Victory | 0% |
| Solid Victory | 25% |
| Marginal Victory | 50% |
The damage severity of a wound is based on a percentile dice roll modified by:
All modifiers are cumulative, and are added to the percentile roll to give a final result based on the damage table. The damage table is configurable by each game. Here is the standard one:
| Roll | Result |
|---|---|
| 19 or less | Graze |
| 20 - 69 | FleshWound |
| 70 - 94 | Impaired |
| 95 or higher | Incapacitated |
Wounded characters receive a damage modifier to subsequent attack and defense rolls.
| Wound Level | Damage Modifier |
|---|---|
| Graze | 0 |
| FleshWound | 0.25 |
| Impaired | 2 |
| Incapacitated | 7 |
Each wound contributes to the total modifier. So a character with an Impaired wound to their arm and a Flesh Wound to their leg would have a total modifier of 2.25.
Once a wound has been treated, healed naturally, or mitigated by a combat/hero luck point, the damage modifier is reduced by 1/2.
Damage modifiers are intended to only apply during combat, but storytellers may impose modifiers at their discretion to reflect lingering wounds the same as any other modifier.
At the end of a combat round, every character or vehicle who suffered damage during that round will make a knockout roll. This is a Composure roll, modified by:
If a KOed character is treated or rallied, they can make a KO roll again at +3 to become un-KOed.
FS3 uses a custom hit location system. First choose a hit location you’re aiming at. Typically this is the center of mass (chest for humans) unless you’re doing a called shot. Imagine an archery target with rings superimposed over this hit location.
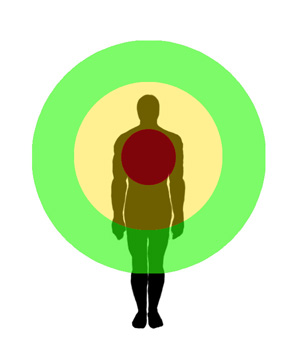
The better you roll, the closer you’ll get to the bullseye.
Mechanics-wise, each hit location is assigned a list of 10 places where a hit might land, corresponding to the green, yellow and red zones of the bullseye chart.
Hit location is determined by rolling a random number from 1-10, then adding the attacker’s net successes. So the more successes, the closer you’ll get to the bullseye.
When you target a hit location other than the center of mass, it shifts the bullseye to that location.
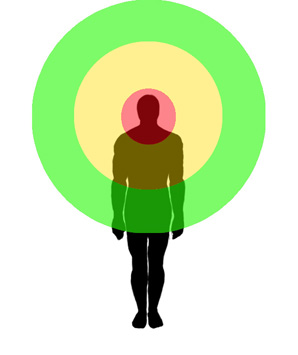

Notice that more of the bullseye now falls on dead air, increasing the chance of a miss. With a called shot, consider the attacker’s net successes.
| Attacker Net Successes | Location |
|---|---|
| >= 3 | Exactly Where Aimed |
| 2 | Random roll with the bullseye centered on a different location |
| 1 | Near Miss |
| 0 or fewer | Miss |
So each location has its own hit location chart for use in called shots.
If a vehicle is hit in a crew compartment, each passenger may receive shrapnel wounds. The amount of shrapnel depends on the damage to the vehicle.
| Vehicle Damage | Shrapnel |
|---|---|
| Graze | 0 |
| Flesh | 0-1 |
| Impair | 0-2 |
| Incap | 0-4 |
Mounts are similar to vehicles, but simpler. The game configuration defines types of mounts (e.g. Horse, War Horse, Elephant). Each type of mount provides a bonus to attack against unmounted opponents. When an unmounted opponent attacks the rider, that bonus is subtracted from the attack roll (making it harder for someone on the ground to hit a mounted rider).
When a mounted opponent is hit, there’s a chance the hit will hit the mount instead of the rider. If the attacker gets 3+ net successes, he automatically hits the rider. Otherwise, there’s a 20% chance of hitting the mount if the attacker is also mounted, and 40% if he’s unmounted. You can also target the mount specifically, giving you a 90% chance of hitting the mount.
Every time a mount is hit, it gets a knockout roll with a number of dice equal to the mount’s toughness rating. You can use toughness to reflect the mount’s size and/or armor. If a mount fails it’s KO roll, it’s taken out and the rider becomes unmounted and takes some fall damage. Otherwise the mount is only injured. This is just a RP effect; damage isn’t tracked for mounts.
← Previous |